I will post some of my own art on here soon, but in the meantime, make sure you don’t miss these 2 fabulous countdowns to Mother’s Day.
http://artist-how-to.com/Countdown.htm
http://countdown.tentwostudios.com/
I will post some of my own art on here soon, but in the meantime, make sure you don’t miss these 2 fabulous countdowns to Mother’s Day.
http://artist-how-to.com/Countdown.htm
http://countdown.tentwostudios.com/
I almost missed this one! Lisa Vollrath at tentwostudios is having a holiday countdown for March, and today is the last day.
http://countdown.tentwostudios.com/
A lovely mix of St. Patrick’s day and Easter images. All you need to do is post a link to the countdown and then you get to download all of them.
Many thanks to everyone on the Artist Circle group that gave me suggestions on how to finish my ATCs.
I got the lottery series ones done, and decided to let the self-portrait ones simmer for a while as I worked on other things.
I’m pretty pleased with how these turned out.


I’d love to hear comments or critiques on these if you have them.
I think my muse is trying to tell me something.
As you can see from my previous posts, I work mostly in paper – altered books, ATCs, some collages, etc.
Something I’ve never worked on or even thought about working on is canvas. It seemed too “high art” for simple old me.
But today I was poring through an old Dick blick’s catalog and saw they had multi-packs of mini-canvases for sale. This was inspiring – I like working in small formats and restricted spaces. I also like working in multiples or series.
Then, someone in one of the Yahoo groups posted about a project they had just completed. They’d made a mixed media piece on a corner canvas – but they used it backwards so the sloped sides became part of the artwork. Beautiful work, and very creative use for something that is generally used in very traditional work.
A few hours later, someone in another Yahoo group posted about a project she had just completed – a mixed media piece using the back of a canvas! http://greenwomandesign.blogspot.com/2008/02/tintypes-and-daytona-500.html
So, I went from not thinking about canvas as a possible medium at all to seeing it in 3 different places within a few hours. And not only that, but 2 of the 3 places talked about flipping it around and using it as a pseudoframe.
That’s the kind of coincidence that means I must try my hand at something like this soon. If that’s not a message from my muse, I don’t think I’d be able to ID one if it hit me over the head!


Our first project for February for the Artist Circle Yahoo group was to make 3 part ATCs – a background, a focal image, and an embellishment.
Initially, I found this project tremendously inspiring, but I’m afraid I’ve gotten in trouble by interpreting the instructions too literally. Below are my ATCs all with only 2 parts – I’m stumped on how to complete them. I’d love any ideas you can give me.
Part of my problem is being new to the whole art scene. My stash of images and embellishments is not terribly large. Most of my images are cut out from magazines, catalogs and junk mail.
I don’t even know where to begin as far as embellishments go. Most of my work thus far has been fairly flat rather than 3-D. I realize I could use another image as my embellishment, but I’d really like to break out of my box and do something really cool here.
I’m open to buying new products if I get specific recommendations for something that will give great results. I really just want to get these done so they aren’t weighing on my mind any longer. I’m really excited about our next project but feel I can’t move on until I’m finished with these. (more…)

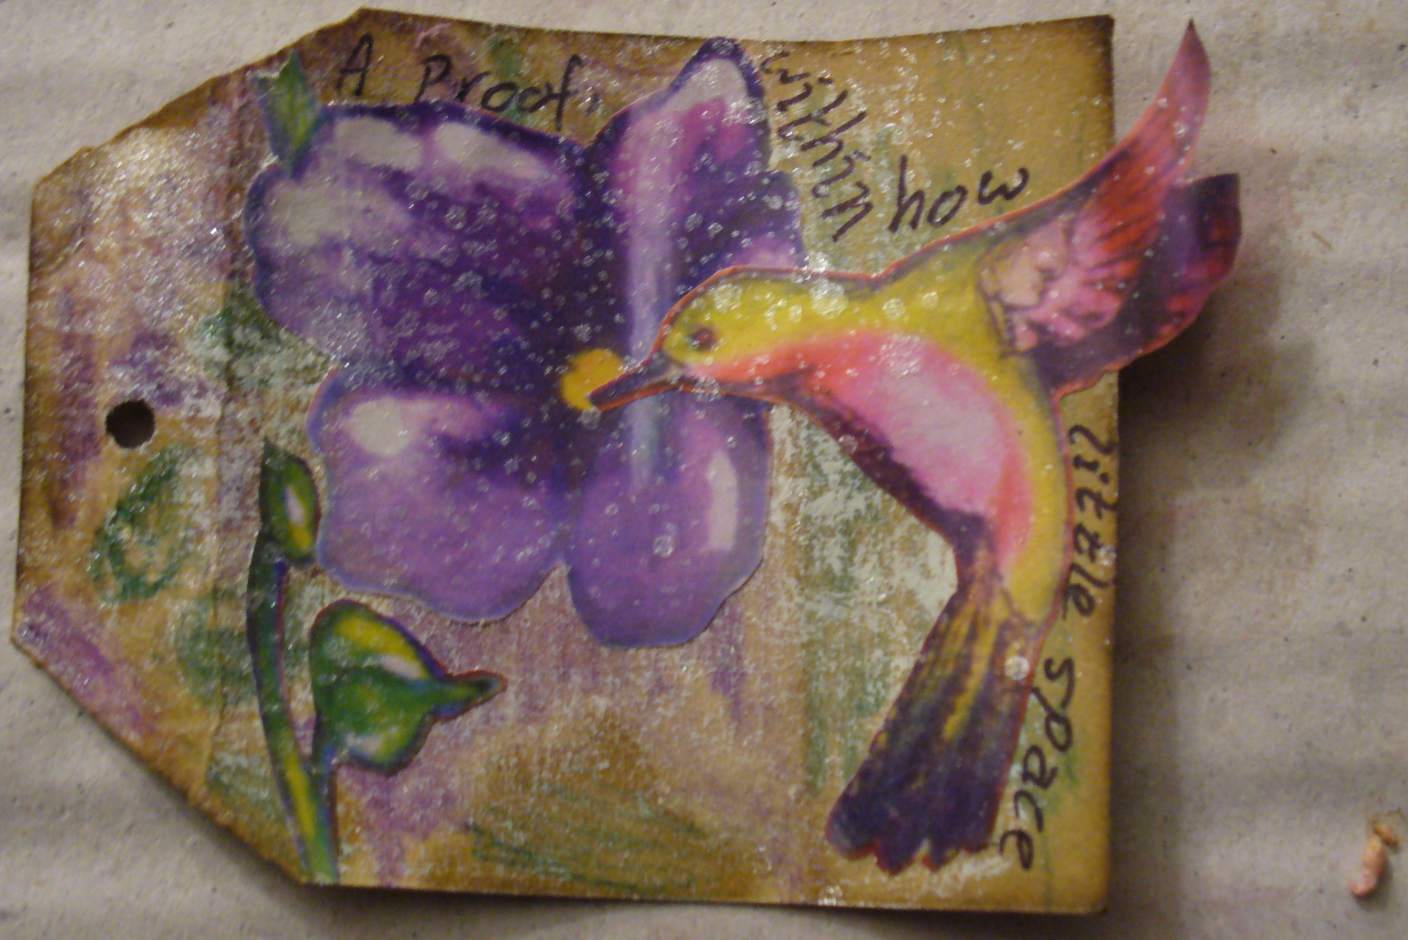
As I mentioned in my previous post, our project at The Artist Circle Yahoo Group was to create a tag booklet. We started with coffee staining some tags, then colored them in various ways, followed by different embellishments. The final tag booklets were as varied as they could be, with all sorts of colors, artistic styles, and themes. This is really a great group for anyone looking for inspiration and encouragement to try lots of different artistic projects.
I really liked the first tags I made, but they were a mishmash of shapes, sizes and materials, and I wanted a more uniform look for the final book, so I made myself some more. I simply cut a single sheet of cardstock into 2 1/2″ X 2′ rectangles, then cut the corners at angles and punched holes for the tags. So these were little tags, but I like the small size. I think being constrained by a small space forces me to maximize my creativity.
I coffee-stained, colored and dry-brushed the new tags with gesso. (There were a few days between each of those steps, because I like time to think about where I want to go next.) Then I started looking for images or themes for my finished book.
In a catalog (one of my favorite sources for free imagery to use in my artwork), I found a set of glasses with pictures of hummingbirds and flowers on them. They were exactly the right color, and more importantly, the right size for my booklet.
I cut the hummingbirds and flowers out, and played with several arrangements of the images on my tags. When I had a layout I liked, I glued everything down. I then sprayed all the tags with Platinum Pearl Color Mist spray for an additional unifying layer.
The tags were pretty, but fairly bland, so I went to Google to find some hummingbird related text to go on them. I found this site, with the perfect hummingbird poem by Charlotte Smith. I added this to the tags, one line per tag, in black Sharpie.
The Hummingbirds
by Charlotte SmithMinutest of the feathered kind,
Possessing every charm combined,
Nature, in forming thee, designed
A proof within how little space
She can comprise such perfect grace,
Rendering the lovely; fairy race
I was happy at this point with the look of each individual tag.


Now, how to put them together?
I considered various options – craft wire, binder rings, a stick and ribbon close, but ultimately decided that the look was best maintained by a simple binding of ribbon through the hole in the tag.
I still had 2 problems, though.
1) While the tags all looked good and like they belonged together, the booklet as a whole still looked unfinished.
2) I wanted the attribution for the poem to be more prominent. (I had written it on the back of the last tag, but it’s kinda hard to read, and you’d have to look for it.)

The obvious solution to both problems was to add another tag – a cover that would have the poem’s title and attribution on it. But none of my leftover tags jumped out at me as being right for this purpose.
What did look like it might work was a tag I’d saved from a toy the baby had been given for Christmas. It was the right size, but an oval shape, which I thought would be a nice contrast with the body of the book.
I painted the tag with green acrylic paint, a fairly thick layer to obscure the writing on the tag. I then applied some gold ink with a baby wipe to add some sparkle. A quick spray with the Platinum Pearl color mists worked to tie the cover in with the rest of the tags.

The final step was to write the name of the poem and the author on the front of the cover, write my name and the date on the back of it, and tie everything together with the ribbon.
Someone on one of the groups recently asked why anyone would choose to participate in a traveling journal project since they didn’t get anything to keep at the end of it. Here’s some of the reasons I wanted to do this:
I found another website that is giving away images counting down to Christmas:
http://artist-how-to.com/Christmascountdown07.htm
They ask that you link to their site before downloading the images.
Serendipity has an ongoing collaborative journal project. She mails out a journal to an artist who keeps it for 15 days, and works in it for at least 10 of those days. He or she then mails it back to Seren, who photographs it, putting the images up on her website, and sends the book on to the next artist on her list.
I signed up for this project a couple of weeks ago, and my book arrived last night. It looks like I’m the 3rd artist to work in this journal. The artwork that’s already in there is incredibly lovely-2 very different styles, both wonderful work .
I’ve been part of the altered art world for a while now, but this is my first chance to see someone else’s book art in person. If you think pictures posted online are beautiful, seeing and touching the actual art will take your breath away.
I was so motivated holding this book in my hands and seeing what was already in it, I got tons of ideas for what I could do in it. I had to force myself to take the disciplined approach and only do one spread today. I might go ahead and do a couple of backgrounds in advance just because I’m itching to do more.
I’m going to be photographing the art I make in this book, but I’m going to hold off on publishing those images here. I like the idea of having them up on Seren’s blog anonymously for a while to see what kind of response they get.
I’ll probably be blogging about this a lot over the next 2 weeks.
Looks like today is the day for Christmas presents from our fellow artists. Christy at Average American Girl is giving away brushes she’s created to use in Photoshop. (I don’t use Photoshop much, but for those who do, this is a great resource.)
These are covered by the Creative Commons License – use them in your own art, but you can’t repackage or resell the brushes themselves.
Here’s the link: http://averageamericangirl.com/blog/?page_id=128
Again, I’d love to see the art you create using these tools.
Lisa Vollrath at Ten Two Studios is giving away printable goodies on her site in exchange for a link. I’ve participated in some of her countdowns before, and the images are always beautiful. There’s also always a variety, so there’s something to appeal regardless of your aesthetic.
Here’s the link: http://countdown.tentwostudios.com
Enjoy! (And do share pictures of what you create with what you download)
Someone on one of our groups asked this question recently. To paraphrase them: Why not just create art in a blank new book; why use an existing pre-printed book?
It’s a question that comes up fairly often. None of my close friends are into art at all, so I’ve had all too often the experience of telling someone about my work to be greeted with the look of horror and the gasped, “You did what to a book?”
I certainly understand the sentiment behind the question. There is definitely something taboo and a little shocking about the idea of altering (some might even say desecrating) a book.
It’s not the medium for everyone. Many people absolutely cannot get past the idea that they are destroying something valuable, even if it is to create something else that is valuable in its own right.
There are many other ways to showcase creativity that don’t involve starting with an existing book. And there are many book artists out there that make their own blank books to showcase their art in.
Still, asking an altered book artist, “Why not just use a blank book?” seems to me like asking a rubberstamper, “Why not just draw all your images?” It comes down to whether we’re focusing on the medium or the message in our work.
Some artists can communicate their message in any medium; their creativity allows them to explore the boundaries of many different types of work. If Picasso were alive today, would he still be working in oils, or would he perhaps be making collages in Photoshop?
On the other hand, some artists depend on the medium, using the limitations and the possibilities of it to create something unique and beautiful. Think of Shakespeare’s sonnets – would he have been as renowned had he been writing free verse?
Starting with a printed book allows an artist opportunities that a blank book, even a beautifully handmade blank book, simply does not afford – opportunities to interact with the original text, to engage (in a way) with the original author in something of a collaborative effort, even to incorporate the input of previous owners of the book who may have left their own marks in it.
No one is forced to be an altered book artist, but that is a choice for the individual artist to make. This is a legitimate medium, and it is a different one from art created in blank books. Both are equally valid and valuable expressions of creativity and many artists engage in both.
Why such a passionate defense of altered books? Because I can honestly say that this form of art helped transform my life.
There’s lots of things I love about ATCs:
So it’s not surprising that one of the first things I did with my new paper trimmer was to cut up a sheet of cardstock into ATC blanks. (I used Lisa Vollrath’s tutorial on how to get 10 ATCs from one sheet of cardstock – you have to register on her site to read the article, but it’s free and well worth it.)
It’s also no surprise that when I saw the guidelines for this week’s Created By Hand Tuesday challenge, I knew I was going to make an ATC. The challenge is to make Christmas themed art using the colors burgundy and vintage browns.
I love the idea of using non-traditional Christmas colors. I think the muted look of the vintage colors is a wonderful way to evoke the spirit of the season.

My ATC was fairly simple to make. I reached for my stock of coffee-stained paper and found some text that contained words like “love,” “divine,” and “miracle” that seemed appropriate for the project. I cut out 1/2″X1/2″ squares around those words .
I then cut out squares from burgundy cardstock just slightly larger and 3/4″X3/4″ squares from coffee-stained text . I used a craft punch to make small stars from the cardstock. I made 3 layered squares – text, burgundy cardstock, text, star. I then laid them down at an angle along one side of the ATC.
I cut out a 3/4″X2 1/2″ rectangle from another text page to place along the right side of the card. I then layered a slightly smaller burgundy cardstock rectangle and a smaller blank coffee-stained paper rectangle on top of that. I used a brown marker to write the words “Christmas joy” on the inner rectangle.
I used a felt-tip marker to draw a frame around the outside 1/4″ edge of the card, and then used a fine-tip marker to draw fine lines along the outside of the right and bottom lines of the border. I really like the look this gave the card – I think it makes it look somewhat like gift wrap.
I’m really happy with what my finished card ended up looking like. I think it really comes across conveying Christmas even though I don’t use any of the traditional celebration elements in it.
I think my first ATC was a smashing success and I’m looking forward to making many more.
After I made the coffee-stained tags for the Artist’s Circle project, I had coffee left over and so I decided to pull out a bunch of my scrap paper and stain that too.
This included everything from pages pulled out to thin out books for altering, to fake checks included in my junk mail to tissue paper to lottery tickets (not winning ones, obviously).
I used all the various techniques that I used on the tags – soaked them in the coffee, dribbled some over the top, sprinkled dry crystals and salt over the wet paper, and laid various objects over the top and left them to dry.
I got some really interesting results as you can see. And now I have a nice stock of coffee-stained paper to use in future projects.


One of the groups I’m a member of – the Artist’s Circle Yahoo group – is doing a workshop on tag booklets. We each make our own tags following the steps posted, and share pictures of our results. It’s amazing the variety of different results we’ve seen from even such a simple project as this one.
The first step was to coffee-stain 12 tags. I didn’t have any ready-made tags on hand, so I cut some myself. I decided to take this opportunity to experiment with different weights of paper, as well as different staining techniques.
I used regular medium-weight paper, some textured gift wrap, kraft paper, and some lightweight cardboard (the packaging my paper trimmer came in, as a matter of fact). I cut 4 tags out of each material.
We don’t drink coffee ourselves, but we do keep a jar of instant on hand for house guests, so that’s what I used. I put in 1 tablespoon of crystals into just over half a cup of hot water.
To get an overall stain on the tags, I tried several different techniques.

To my surprise, not only did all these methods give very similar results – an even light brown – but there wasn’t any appreciable difference between the various types of paper.


Then I tried various methods to get more interesting patterns on the tags.


Some general tips I learned from this exercise
This was really fun, and I’m looking forward to the next steps.
I’ve been a member of various art groups for years now, but have never been terribly active on any.
I’ve decided that the time is right for me to jump in with both feet and make some art I’m willing to share with the rest of the world.
I’ve signed up for a swap or two, joined The Artists Circle Yahoo group, and ordered some supplies I’d been eyeing for a long time. The next step is to set up a place to share my art – that’s what I’m doing now.
What comes next? Make some art, of course!
See you when it’s ready 🙂
| S | M | T | W | T | F | S |
|---|---|---|---|---|---|---|
| 1 | 2 | 3 | 4 | |||
| 5 | 6 | 7 | 8 | 9 | 10 | 11 |
| 12 | 13 | 14 | 15 | 16 | 17 | 18 |
| 19 | 20 | 21 | 22 | 23 | 24 | 25 |
| 26 | 27 | 28 | 29 | 30 | 31 | |


